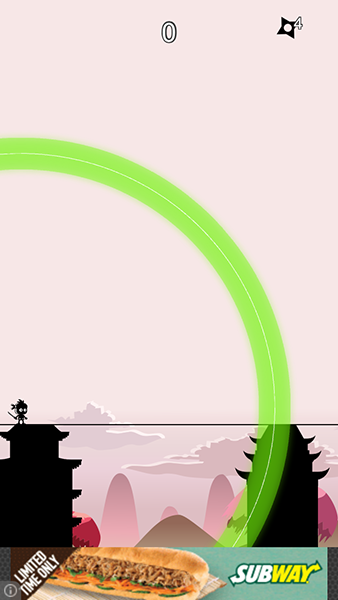
With the recent changes to PhoneGap Build we now have access to use all plugins that are listed on plugins.cordova.io as well as the plugins on the PhoneGap Build website. This means that we now have access to the AdMob plugins, which will allow us to integrate AdMob with PhoneGap Build applications.
AdMob will allow you to display advertisements to users of your mobile application, and earn revenue from displaying them – similar to how AdSense works for websites. This is a very common monetisation strategy for mobile applications, games especially. With enough users it can bring in a significant amount of revenue. It also ties in nicely with an in app purchase that offers to remove advertisements from the application if the user wants an ad free experience – this is also a very common monetisation strategy.
AdMob vs iAd for PhoneGap Applications
AdMob is Googles solution for mobile advertisements, iAd is Apples solution. We can use either, but which should we choose? What are the differences?
You can use both actually, using one as a fallback for the other if no advertisements are available. However, developers have reported recently that they are receiving higher fill rates and revenue for clicks with the AdMob platform.
Stack Overflow user Luc Wollants, giving advice to somebody on this topic, stated that:
The best approach is always going to be using a combination of both, and there’s some strategies on how to approach that, but in this tutorial we will just be looking at setting up AdMob.
What’s the difference between Interstitial and Banners ads?
There are two types of advertisements you can create with AdMob, which are:
- Interstitial ads
- Banner ads
Interstitial ads are those ones that pop up and take up the whole screen (annoying! but effective). As an example in a mobile game I’m creating I create an interstitial ad each time the player gets to the game over screen – you definitely want to make sure you don’t display an interstitial ad whilst a user is in the middle of a game in most cases!
Banners ads are visible all the time (unless you hide them of course). Typically these are placed as a small rectangular banner either at the top or bottom of the application.
Setting up Your AdMob Account and Advertisements
Before getting started with AdMob you will need to create an AdMob account with Google. An AdMob account will require a Google account, as well as both an AdSense and AdWords account. If you do not have these accounts already then you can create them all in the process of signing up for AdMob (no need to go register for them separately beforehand).
You will need to create the type of advertisement you want to use in your AdMob control panel. If you want to use both interstitial and banner ads then you will need to create and configure these separately.
- Click ’Monetize New App’ and create your application
- Create both an Intertitial and Banner ad by clicking ’New ad unit’
Adding Ads to Your Application
Now it’s time to get down to some coding. First, you will need to make the functionality available within your application by including the plugin in your config.xml file:
<gap:plugin
  name="com.admob.plugin"
  version="3.0.0"
  source="plugins.cordova.io"
/>
There are a few options, but we will be using this plugin. After that there’s some configuration that needs to take place in the application.
1. Configure AdMob once the device is ready
You will need to add the following code to your application, after the device ready event has fired:
admob.initAdmob('ca-app-pub-BANNERID', 'ca-app-pub-INTERSTITIALID');Make sure to replace the ID’s above with your own from your AdMob control panel.
2. Prepare an Interstitial Ad
If you want to use an Interstitial ad, you will also have to cache that beforehand, you can do that with the following code:
document.addEventListener(
  admob.Event.onInterstitialReceive,
  this.onInterstitialReceive,
  false
);
admob.cacheInterstitial();
3. Show a Banner Ad
Displaying a banner ad is a simple one liner, which can be achieved with the following:
admob.showBanner(admob.BannerSize.BANNER, admob.Position.BOTTOM_APP);The second parameter takes in the position of your banner ad, in this case we are placing the ad at the bottom of the application, which will look something like this:

You could also change the second parameter to admob.Position.TOP_APP to place the banner at the top of your application instead. You can also place banner advertisements absolutely using the following code instead:
admob.showBannerAbsolute(admob.BannerSize.BANNER, 0, 70);4. Show an Interstitial Ad
It is similarly easy to trigger an Interstitial ad:
admob.isInterstitialReady(function (isReady) {
  if (isReady) {
    admob.showInterstitial();
  }
});
Taking it further
This tutorial covers the basics of this AdMob plugin, and achieves a pretty common set up for advertisements in mobile applications – a constant banner view as well as pop up ads at certain times. There is more to this plugin to explore though that I haven’t touched on yet.
There are options to specify configuration settings for your adverts (such as setting a testing flag or setting keywords), but most notably the plugin also supplies a whole bunch of events. These events can be used to modify the behaviour of your advertisements based on whether ads are available and what your user is doing. Events available include:
- onAdmobBannerDismiss
- onAdmobBannerFailedReceive
- onAdmobBannerLeaveApplication
- onAdmobBannerPresent
- onAdmobBannerReceive
- onAdmobInterstitialDismiss
- onAdmobInterstitialFailedReceive
- onAdmobInterstitialLeaveApplication
- onAdmobInterstitialPresent
- onAdmobInterstitialReceive
You may want to hook into the onAdmobInterstititalReceive to display an advertisement as soon as it is ready for example. There’s a lot you can do to make your advertisement monetisation strategy _really smart _but we will be leaving it at that for this tutorial. If you want to start diving deeper into this AdMob plugin then you can read the documentation on GitHub.
If you’ve used AdMob or iAd in the past it’d be great to hear about your experiences with them, so feel free to leave a comment below!

