One of the most common questions I receive about Ionic is how to create a route between two points with Google Maps. I have quite a few tutorials on doing various things with Google Maps in Ionic, so I thought it was time to tackle this problem as well.
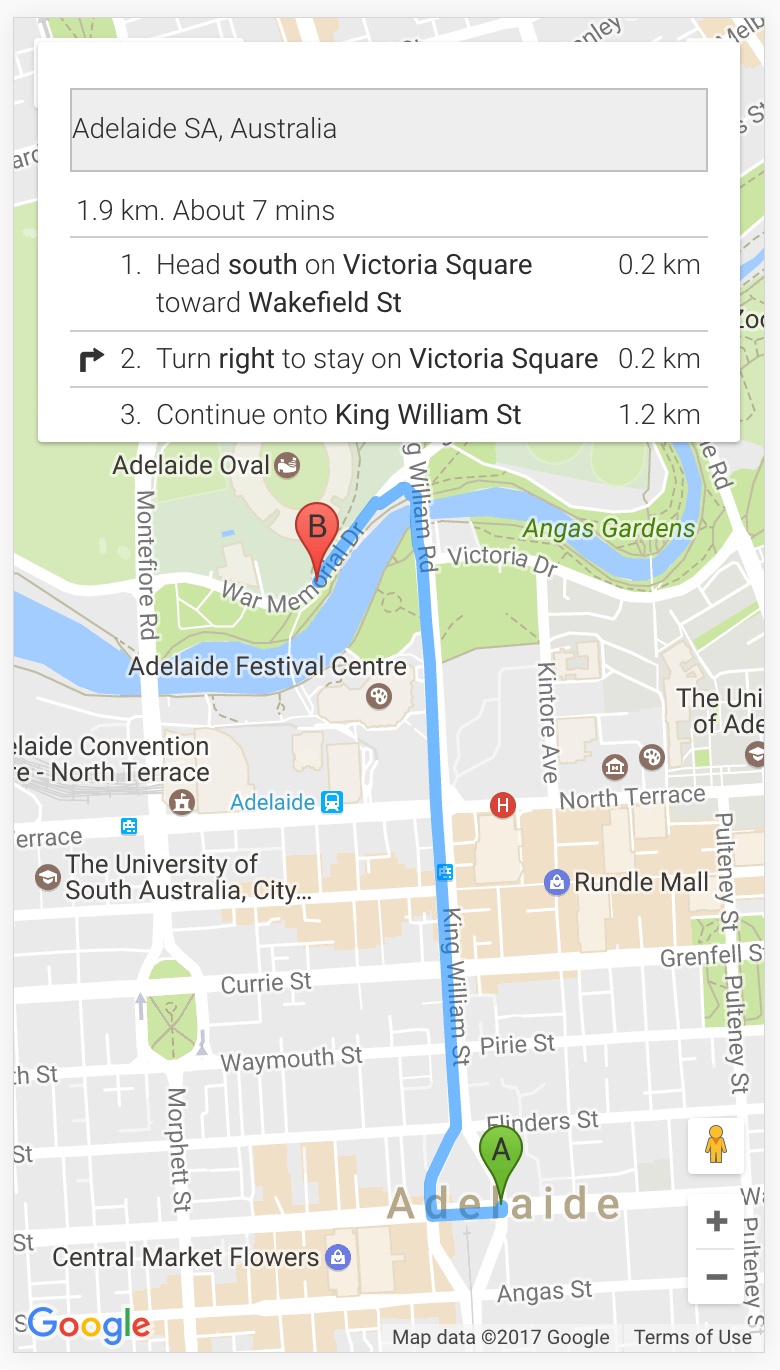
We are going to create a simple application that will display a Google Map and use the DirectionsService and DirectionsRenderer that the Google Maps Javascript SDK provides to display the route between two points on the map, and also provide turn by turn directions.
This is what the application will look like when we are done:

Google Map’s turn by turn directions will be added to the panel at the top, and the user will be able to scroll through those directions.
Before We Get Started
Last updated for Ionic 3.0.1
Before you go through this tutorial, you should have at least a basic understanding of Ionic concepts. You must also already have Ionic set up on your machine.
If you’re not familiar with Ionic already, I’d recommend reading my Ionic Beginners Guide first to get up and running and understand the basic concepts. If you want a much more detailed guide for learning Ionic, then take a look at Building Mobile Apps with Ionic.
IMPORTANT: I will not be covering how to set up a basic map with Google Maps in this tutorial. You may wish to follow this basic tutorial for setting up Google Maps in Ionic if you do not have Google Maps set up already.
1. Add a Directions Panel to the Template
You will need to open up the template that contains your Google Map, and add an additional section that will hold the “directions panel”. This is the area that will hold the turn by turn navigations:
<ion-content>
  <ion-card>
    <ion-card-content>
      <div #directionsPanel></div>
    </ion-card-content>
  </ion-card>

  <div #map id="map"></div>
</ion-content>
I have just used an <ion-card> in this case, but you can use whatever you like and style it however you want – these are the styles I used:
.ios,
.md {
  home-page {
    .scroll {
      height: 100%;
    }

    #map {
      width: 100%;
      height: 100%;
    }

    ion-card {
      max-height: 200px;
      overflow: scroll;
      position: absolute;
      z-index: 1;
    }
  }
}
The Google Maps Javascript SDK will just inject the content for the turn by turn navigation into whatever container you want to attach it to.
2. Implement the Directions Service
Now that we have the container set up, we need to configure the DirectionsService with the route we want to take, and then use the DirectionsRenderer to display that route on the map and create the turn by turn directions.
Here’s what it should look like:
import { Component, ViewChild, ElementRef } from '@angular/core';
import { NavController } from 'ionic-angular';

@Component({
  selector: 'home-page',
  templateUrl: 'home.html'
})
export class HomePage {

    @ViewChild('map') mapElement: ElementRef;
    @ViewChild('directionsPanel') directionsPanel: ElementRef;
    map: any;

    constructor(public navCtrl: NavController) {

    }

    ionViewDidLoad(){

        this.loadMap();
        this.startNavigating();

    }

    loadMap(){

        let latLng = new google.maps.LatLng(-34.9290, 138.6010);

        let mapOptions = {
          center: latLng,
          zoom: 15,
          mapTypeId: google.maps.MapTypeId.ROADMAP
        }

        this.map = new google.maps.Map(this.mapElement.nativeElement, mapOptions);

    }

    startNavigating(){

        let directionsService = new google.maps.DirectionsService;
        let directionsDisplay = new google.maps.DirectionsRenderer;

        directionsDisplay.setMap(this.map);
        directionsDisplay.setPanel(this.directionsPanel.nativeElement);

        directionsService.route({
            origin: 'adelaide',
            destination: 'adelaide oval',
            travelMode: google.maps.TravelMode['DRIVING']
        }, (res, status) => {

            if(status == google.maps.DirectionsStatus.OK){
                directionsDisplay.setDirections(res);
            } else {
                console.warn(status);
            }

        });

    }

}
I have the basic Google Maps implementation set up as normal, but I have added a new function called startNavigating that is called from the ionViewDidLoad function. We create instances of both the DirectionsService and the DirectionsRenderer and then we supply our map reference to the setMap function and a reference to the directions panel element we set up in the template to the setPanel function. We grab a reference to this element using @ViewChild at the top of the file.
We configure the DirectionsService by calling the route method and supplying it with an object that details the origin and destination, as well as the mode of travel. There are many other configurations available that you can use in this object, so make sure to take a look at the documentation.
In this case, we are just supplying a text address, but you can also supply latitude and longitude directly if you like:
origin: {lat: 37.77, lng: -122.447},
    destination: {lat: 37.768, lng: -122.511},
The second part of the route configuration is a callback function that will run after the request is made to Google Maps. We get a response back, and if that response is successful we call the setDirections function which will complete the process.
If you run the application now, you should see something like this:

Summary
This is just a basic example with hard coded values, but you could easily extend this to do things like navigate from the user’s current position or allow the user to enter in their own positions. Also, as I mentioned, there are many more configurations you can use as well that will allow you to do things like add additional waypoints, specify the unit system to be used, whether or not to avoid tolls and so on.

